Khasiat Petai...nyum nyum


ni dia khasiat dier

Strok
Berdasarkan penelitian yang diperolehi daripada The New England Journal of Medicine mendapati amalan memakan petai setiap hari berupaya menurunkan risiko kematian akibat strok sebanyak 40 peratus.


Merawat perokok
Petai dikatakan berupaya membantu individu yang ingin berhenti merokok. Vitamin B6, B12, kalium dan magnesium yang terdapat di dalam petai dikatakan berupaya membantu tubuh sembuh cepat daripada ketagihan nikotin.


Anemia
Dengan kandungan zat besi yang tinggi, petai berupaya menstimulasi pembentukan sel darah merah sekali gus mengurangkan derita pesakit anemia.

Bahaya mengadap komputer lama


Ramai yang masih tidak sedar bahawa duduk terlalu lama di depan komputer atau bekerja selama berjam-jam secara pasif di atas kerusi akan membuat otot-otot tubuh kita terasa kaku, keras dan mata menjadi pedih. Malah selain keluhan ringan tersebut tersembunyi juga ancaman lain yang berisiko bagi kesihatan. 

New Zealand Medical Journal dalam edisi terbaru, melaporkan kajian dari Institut Penyelidikan Perubatan New Zealand menunjukkan bahawa pekerja pejabat yang menghabiskan masa terlalu lama duduk di meja masing-masing berisiko tinggi menghadapi masalah darah beku. Penyelidik mendapati, satu pertiga daripada pesakit yang dimasukkan ke hospital kerana mengidap -trombosis pembuluh darah vena (DVT) atau darah beku, adalah mereka yang menghabiskan masa berjam-jam mengadap komputer. 

Evil Dead 2:Dead by Dawn (1987) DVDRip - 300MB


Code:
http://www.imdb.com/title/tt0092991/
Code:
[Movie Title ]….[ Evil Dead 2:Dead by Dawn
[Release Year ]…[ 1987
[iMDb Rating ]….[ 7.9/10
[Genre ]……….[ Fantasy | Horror | Thriller
[Runtime ]……..[ 01 : 24 : 16
[File Size ]……[ 300 MB
[Resolution ]…..[ 720 x 480
[Frame Rate ]…..[ 23.976 fps
[Video C/B ]……[ MPEG4 Video (H264) 640x352 23.98fps
[Audio C/B ]……[ AAC 48000Hz stereo
[Language ]…….[ English
[Container ]……[ MatRoska
Code:
The lone survivor of an onslaught of flesh-possessing spirits holds up in a cabin with a group of strangers while the demons continue their attack.

Rites of Passage (2011) BluRay 720p 700MB [Mediafire]


PLOT

An anthropology student brings some of his classmates to his family ranch, where his brother lives in a haze of drugs, guilt, and Chumash Indian rituals


SCREEN 


Evil Dead 3:Army of Darkness (1992) DVDRip -300MB


Code:
http://www.imdb.com/title/tt0106308/
Code:
[Movie Title ]….[ Evil Dead 3:Army of Darkness
[Release Year ]…[ 1992
[iMDb Rating ]….[ 7.6/10
[Genre ]……….[ Fantasy | Horror | Thriller
[Runtime ]……..[ 01:20:57
[File Size ]……[ 300 MB
[Resolution ]…..[ 624 x 368
[Frame Rate ]…..[ 23.976 fps
[Video C/B ]……[ MPEG4 Video (H264) 640x352 23.98fps
[Audio C/B ]……[ AAC 48000Hz stereo
[Language ]…….[ English
[Container ]……[ MatRoska
Code:
A man is accidentally transported to 1300 A.D., where he must battle an army of the dead and retrieve the Necronomicon so he can return home.

The Confession (2012) DVDRip 250MB [Mediafire]


PLOT

A unique story of redemption and an exploration of good and evil featuring a hit man and a priest


SCREEN 


The Orphan Killer (2011) BRRip 500MB [Mediafire]


[FORMAT]:…………………..[ Matroska (.mkv)
[GENRE]:……………………[ Horror
[Stars]:……………………[ Diane Foster, David Backus and Matt Farnsworth
[FILE SIZE]:………………..[ 500 MB
[NO OF CDs]:………………..[ 1
[RESOLUTION]:……………….[ 1280 X 544
[ASPECT RATIO]:……………..[ 2.35:1
[FRAME RATE]:……………….[ 23.97 fps
[LANGUAGE ]:………………..[ English
[SUBTITLES]:………………..[ No


SCREEN 


Potoshop : fantastic 4 effect


Step 2 – Accentuate the shadows


potoshop : photo manipulation


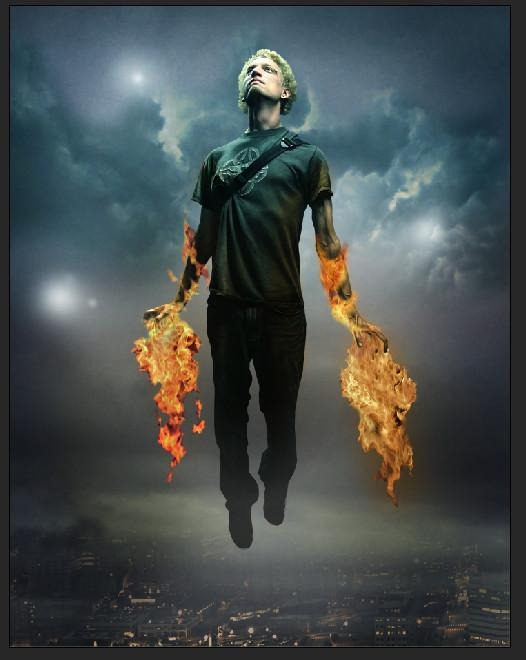
This Photoshop tutorial, you will learn how to use a variety of color, lighting, and cut and paste techniques to create a surreal photo manipulation. Combine your creativity with these Photoshop techniques to create your own photo manipulation artworks.


Step 1 - Place the background

The first step it’s to place the sky, our background, into the image. As you can see, we have changed the color of it. We’re going to create a half of the image with a warm tone and another with a cool tone using the color balance tool. To do this, select the sky and then choose Image > Adjustments > Color Balance. Adjust the input sliders to add red and yellow. Select “highlights” and “shadows” then try adding more of these colors until you like the tones in your image.


Step 2 - Coloring the sky

Potoshop : Creative text effect


In this Photoshop tutorial I would like to show you creative way how to displace the text and get an interesting effect on it.
To start create a new document sized 1000×500 pixels and fill it with color of #f4f4f4.


After that add some dark line to divide the floor from the wall. Get out the Elliptical Marquee Tool and create selection as shown on the picture which you can see below. Then fill this selected area with black to transparent gradient.


Remove selection with Ctrl+D and apply Filter > Blur > Gaussian Blur with similar settings to these:


The result should look like this:

potoshop : Gambar pada Cubic


Get out the Rectangular Marquee Tool to create square selection about 250×250 pixels and fill it with different color, for example black.


Add two square areas more to make three skins for all of cube sides. Now, select one of the black squares with Select > Load Selection, after that go to the background layer with dragon copy it using Ctrl+C.


Then go to the main canvas and paste copied part image into it using Ctrl+V.


Potoshop : Futureristik effect


Duplicate layer with Ctrl+J and apply Filter > Blur > Gaussian Blur with next presets:


Mess with the layer mode & opacity/fill. I tried Soft Light with opacity of 50%. So, the result should be next:


Potoshop : Licinkan Wajah


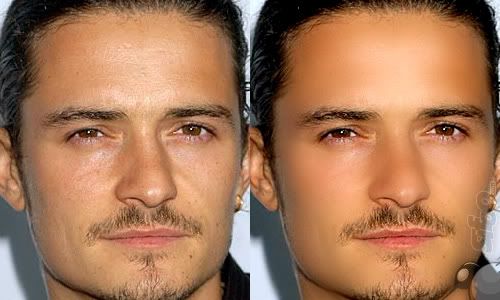
Gunakan Photoshop untuk melicinkan kulit muka seseorang di dalam foto. Teknik ini menggunakan Filter: Blur dan High Pass.

Kita akan cuba licinkan muka Orland Bloom. Lihat perbezaan sebelum dan selepas di atas. Jom buat!

LANGKAH 1:
Buka foto orlando.jpg di dalam photoshop (dapatkan daripada fail zip di bahagian bawah tutorial ini).

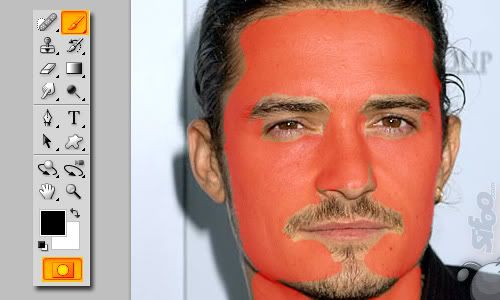
Kemudian, aktifkan Quick Mask (tekan ikon di bahagian bawah toolbar, atau tekan key ‘Q’).

Dengan menggunakan Brush, beruskan di atas bahagian muka yang kita nak licinkan (lihat imej di atas).

*Gunakan Eraser untuk memadamkan bahagian yang terlebih selepas menggunakan berus tadi, sekiranya perlu.

LANGKAH 2:

Potoshop : Ubah gambar asal menjadi lakaran


Aku cuba untuk bereksperimen dengan foto dan mencampurnya dengan garis hitam untuk mensimulasikan gambar. Adakah anda tahu bagaimana cara membuatnya? Ok, kemudian membaca tutorial ini.

Mari kita mulai dengan mencari gambar gadis cantik dengan pemotongan rambut. Aku pergi ke Google Images dan mendongak gambar, anda boleh merasa bebas untuk mendownload gambar dari http://www.photoshopstar.com/wp-cont...fect_woman.jpg. Bukalah imej dan desaturate di awal dengan Image> Adjustments> desaturate atau tekan Ctrl + Shift + U.

Selepas itu meningkatkan kontras dengan Image> Adjustments> Levels:

Lihat perbezaannya sekarang?

Potoshop : Ubah Face Texture


Ok, now open up both of your photos in Photoshop, you can either keep it at it’s current size of resize it down a little bit if you want. After that bring the texture picture to the canvas with the man’s face:


Flip this texture vertical with Edit > Transform > Flip Vertical and set opacity up to 50% for this layer:


Ok, then mess with the layer mode & opacity/fill. I tried Multiply with opacity of 80%. After that apply Edit > Transform > Warp to transform the texture as on picture below:

Potoshop : Hair colouring


The first thing that you should make to bring some shine to the hair. Select the Dodge Tool (Brush: 100px, Range: Highlights, Exposure: 30%) and brightened some parts, as shown below:


After that select the Sharpen Tool to add a bit of sharpness in some places.


Ok, move to the next step. Now, proceed to the coloring of hair. I prefer to create multiple strands and make them different colors. For this effect use the Polygonal Lasso Tool to create selection as on my picture below and fill selected area with color of #ef8008 on the new layer.


After that create five more selections and fill each of them with such colors: #f51464, #cd1bd4, #416fb4, #41b0b4 and #b1ce06.


Ok, remove selection with Ctrl+D and apply Filter > Blur > Gaussian Blur with next presets:


Change layer mode to Overlay and see the result now:


After that duplicate current layer with Ctrl+J and reduce opacity to 20% for this layer.


Ok, we are done with woman fringe. Move to the lower part of hair. Create a new one layer and make a new selection with Polygonal Lasso Tool, then fill this selection with color of #b1ce06 on the new layer.


Add five more lines in the same way and using the same colors as before.


Ok, remove selection with Select > Deselect and apply Filter > Blur > Gaussian Blur with similar settings to these:


Change layer mode to Soft Light and you will see the result.


To increase the intensity of color duplicate layer with Ctrl+J and set opacity to 60% up for this layer.


Ok, on this step we are done with this tutorial. On the picture below you can see the difference before and after. Looks really nice as for me, isn’t it?

 
Related Posts Plugin for WordPress, Blogger...